Friday, December 31, 2010

Almost ready!

I finally finished all of the timber work! I had left the rafters until the end since they were not needed to complete the bulk of the frame. When I finally got back to cutting them,  it took longer than expected because I had designed some complicated joinery to cut. It looked great on paper (and looks good finished also) but didn't really make sense to for production. In any case, they are finally finished and oiled and the house is ready to go! Over the next few days I will be working on preparing the trailer for the move. Right now, I am planning on moving the house on Tuesday! Hopefully we don't get a big snow storm first.

Tuesday, December 21, 2010

This is just a quick update, but I am happy to say that I finally have a plan to load the house on the trailer and move it! I picked up about 300 pounds of square steel tube and C-channel from the steel yard today to start preparing the trailer. I am going to bolt the tube along the bottom of the frame of the house to act as skids. The C-channel will be welded across the trailer to bring the width out to 8 feet. Each cross beam will have another piece of the C-channel welded on top to act as a guide. When the time comes to do the move, I will line the trailer up with the house, hook up a winch and pull it up steel ramps, into the guides and onto the trailer. Picture one of those trucks that pick up dumpsters: it is a very similar design.

My goal is to prepare the trailer and move the house by the end of next week. I will put out a call for help when I know what day I am moving. Wish me luck!

Friday, December 17, 2010


Work and other distractions have kept me from my house for a little while, but I am finally back on track. A few days ago I finally finished all of the siding that I can do until the rafters and gable panels are in place. One more item to cross off the list!


It took another afternoon to clean up, move piles of wood out of the way and wrap my head around the plans for my rafters again. When I cut the rest of the timbers for the house, I had skipped the rafters since I couldn't assemble them in the Firehouse. Once again, I should have finished them when I was doing the rest of the timbers. It took a while to sort through my piles of drawings to find the relevant cut numbers. Once back in the mode, it didn't take too long to remember how to do the layout and cutting though. Stephanie came over to help me start cutting the rafters.
Stephanie giving me a few pointers
start with the power saw
finish with a hand saw
The first two rafters oiled and ready to go
This morning I started clearing brush and saplings out of the old path down which I will tow my house into the woods. The location is looking good! I think that once I am finished with the rafters, I will figure out how to get the house onto the trailer and tow it over! This is the last big hurdle and once it is out there I will finish up the roof and all of the other details.

Saturday, November 20, 2010

Finally have a trailer

I bought a trailer yesterday! I have spent the last few weeks tossing around designs and getting frustrated over the cost of raw steel and parts. I have been finding rusty old trailers on Craigslist every morning that just weren't right. Finally, one of them was just right. This trailer is an older construction trailer with a 10,000 lb GVW, more than enough for my house. It has wide axles, good tires, electric brakes, a sturdy but light frame and a rotted out wooden deck (which I would remove anyway). The length is perfect but the deck is only 6'6" wide. All I need to do is throw three steel beams across the bed to provide support for the sill under the posts. This will bring the house to the correct height to clear the tires. I am so glad that I don't need to worry about finding the trailer anymore. Now if I don't get the house outside for the winter it is not due to lack of funds, but only laziness.

The other day I made some custom moulding for the salvaged window and nailed up the siding on the West side. All I have left to side now is some of the back side. Then I will cut the main rafters, build removable panels for the gable ends and the roof and move the house!

Sunday, November 14, 2010

Dutch Door


Yesterday I hung my door. It is a salvaged door that my father found back in PA. The door is very thick (about 2 1/4" thick, exactly the same as my jamb and trim) and made of Bald Cyprus. It was too short and too wide for the opening but it is so similar to the one that I wanted to build that I decided to modify it to fit. When my dad brought it up, he cut it in half so that it would fit in the car, knowing that I wanted to make a dutch door anyway.

Trimming the door down was easy. There was enough stock on the stiles that it was not a problem to cut about and inch and a half off of each one. I planed the hinge stile square again and restored the 5 degree angle on the lock stile. Next I cut the mortices for the hinges and hung the door. After a little more tuning with the plane, both halves swing very nicely and do not bind. All that is left now is to build up the center of the door to make up the vertical dimension.


Every day this thing feels more like a house!

Friday, October 29, 2010

Flashing


I have taken a break this week from working on my house full time to earn some money for a trailer. Ironically, the work that found me is replacing siding on an old victorian house. The house is being repainted and I am replacing the broken or split clapboards. It is interesting to see which claps are broken or rotten and what the cause was. I am learning some lessons by observing the work of the craftsmen from 120 years ago. It is amazing to see how improper repair jobs from relatively recent times have caused premature rot, and how most of the original siding is still in good condition. Seeing this is definitely incentive to try to do things properly on my house.

In the meantime, I did install some siding on my house in the evenings and I finished making my flashing. Here are some photos of manufacturing the copper flashing for the tops of the windows and door.


Wednesday, October 20, 2010

I went out this morning to check out a...
trailer
...but came home with a
new stove!
The trailer could work, but would need more work than I would like to do to make it suitable. It is about 35 feet long, and only 6'6" wide. The length is not a problem as it is easy to cut shorter, but it would take some time to make it wider. On the positive side, it does have very strong axles and electric brakes. This might be my best option if I don't find something else soon.

The stove however, is perfect. It is slightly smaller than the other one I was planning on using but should still be more than adequate to heat the space. Saving space in this house is the key to making it work. The stove is made by Morso in Denmark. It is designed to burn coal or wood and seems to be made very well. My favorite thing about it though is the red enameled, pointy-eared squirrel cast into the side plates! I can't wait to be enjoying its warmth this winter (it is already getting cold)!

Tuesday, October 19, 2010

Et Cetera

Today with the help of Sarah again, the pile of siding on the sawhorses slowly moved onto the house. The East wall is sided to the top of the window, and the others are all sided to the bottoms of the windows. It is a slow but rewarding process to cut the siding, pare it for a perfect fit with a block plane, prime the ends and nail it in place. It is a job that begs one to stand back and appreciate the change every few courses.
Sarah taking a break
During our lunch break, I unexpectedly received a call from a reader of the blog who had seen a cheap trailer nearby that might work for my house. I am going to check it out tomorrow morning. Thanks Glen!

Here are a couple of quick shots of the progress.

Sunday, October 17, 2010

The siding begins

Soldered copper flashing
We had a very productive day on Friday! My friends Pat, Sarah and Steve helped me install the trim, flashing and some siding. Originally I had planned to have everything prepared so that the four of us could put up all of the siding on friday. Unfortunately I had more loose ends to tie up than I thought, and we didn't make it that far. I am very grateful for the help though, without it all of these little jobs would have taken me a long time to finish. In the last hour or so we finally got to the siding, and Pat and Steve nailed up about half of the East wall while Sarah cut the boards. It looks great!
Myself smashing my fingers while trying to drive small bronze nails

Pat finishing the door frame
Thank you Sarah for the pictures!

Wednesday, October 13, 2010


Yesterday I finally finished painting the last of my siding and trim with the help of a friend. There was a lot. Hopefully the time spent back-priming everything will pay off. It is nice to see it all painted and stacked waiting for installation.

Today I unrolled the roll of copper I found in the barn. I measured 42 feet of shiny 16 ounce copper. This is about half of what I need, but a major step in the right direction! I cut 6 inches off of the width of the roll for my flashing and the remaining 18 inch width will be used to form the standing seam roof pans. With the help of a sheet metal break loaned to me by a friend I have already started to form my flashing for the walls.

Tomorrow I have two friends coming to help me install the trim and siding. It will be an exciting day!

Sunday, October 10, 2010

Thoughts on the roof and skylight

With the trim and siding figured out (but not yet installed), I have been thinking a lot about my roof. The maximum legal height for a trailer without a special permit is thirteen feet and six inches. My house, sitting on a trailer thirty-two inches high, will be about twelve feet without the roof. Obviously my roof will need to be removable if I want to move my house without worrying about overhead wires or the law. My roof framing is made up of three rafter sets connected by purlins (see this post for a diagram) which will all be removable. The roof itself will consist of four bolt-on panels. Each one will have beaded pine board on the bottom side for my ceiling, 2x4 framing with insulation in the middle, followed by skip-plank sheathing and then standing seam copper on the outside. The construction of these panels will be straight forward, much like the roof panels I used to make when I worked for the timber frame company. My challenges will be making a removable ridge cap and a seam down the middle that will keep the rain out.

The only other detail that I need to figure out is the skylight. Originally I had wanted to build a raised unit that straddled the ridge as shown in this post. I am realizing that I need something simpler though. My dad sent me a link to the website for New England Skylights (NES), a company in Watertown, Massachusetts that builds beautiful copper windows. They do many new and restoration projects all over New England. The two photos below are of a window made by NES that is actually very similar to what I had envisioned having on my house.

http://www.newenglandskylights.com/projects.html

http://www.newenglandskylights.com/projects.html
Since my roof will be removable, I think I will simplify the window by limiting it to the South side only. The window in the picture below is a restoration done by NES which fits all of my parameters and looks incredible.

http://www.newenglandskylights.com/historical.html

I love the low profile of this window and how it fits so seamlessly into the standing seam roof. I am going to do everything I can to reproduce this. Ideally, I would make it so that it is hinged at the top to allow it to open. Time will tell if i can do this though.

Saturday, October 9, 2010

The wait for the weight is over


There is a set of questions that is almost always asked by newcomers to my project: "So you are going to live in this? Is there going to be a bathroom? When is it going to be finished? How much do you think it will weigh?" The fist two are easy. Yes and no, respectively. The next one I have stopped answering, but the fourth question now has an answer! This evening I finally sat down and computed the estimated weight. The measurements on the finished parts are accurate, and the estimates on the remaining sections are thorough. The grand total for the weight of my house, assuming my timber is fully dry, is about 4,500 pounds: less than I had originally though! This is what I expect it to weigh without a trailer, finished interior walls or the built-in furniture, all of which I have not fully planned out yet. My rough estimate for the finishing touches and furnishings is 1,500 pounds. If my trailer weighs 2,000 pounds, the entire system will be around 8,000 pounds which is still a reasonable weight for my truck to tow.

I am still looking for a suitable trailer. I would like something with a capacity of six to seven thousand pounds and a tare weight of 2,500 lbs or less. The frame must be 8' wide and at least 13' long, riding over the wheels. It doesn't need a deck though since my house can sit on the framing. If anyone comes across one for a reasonable price, please let me know!


I picked up the wood for my exterior trim on Thursday. I bought 1x4 and 1x6 D-Select Eastern White Pine. It is nice looking wood, but it was pricy. The small bundle of wood cost $240. By getting clear kiln-dried wood for everything exposed to the weather, I hope to avoid any repairs due to water damage for a long time. I have already back primed all the stock and as soon as it is dry I will start installing it!

Thursday, October 7, 2010

Cloaked in the miracles of science


After realizing how thin the siding actually is, I changed my plan to include some sheathing over the framing. This warranted another trip to see Larry for some 4/4" by 8" pine boards. He is raising his price by $0.05 to $0.35 a board foot- still a steal. It would have cost me twice as much to use plywood, and I would have had a lot of unusable waste since I have so many window and door openings. The sheathing went up smoothly; it was relaxing work for two rainy days.


I used Tyvek for my housewrap. Housewrap prevents wind from howling through the house, it keeps any stray water that makes it through the siding off of the framing and it allows moisture in the walls to make it outside. Traditionally, builder's felt has been used for this purpose. It is basically heavy paper that is impregnated with asphalt. It had been used for a long time and we know how it performs over time. I decided to use Tyvek because I had a partial roll kicking around. It performs the same function as felt paper but is more expensive since it is made with "The Miracles of Science" as proclaimed by DuPont over every square foot of the stuff. I did a little research and found that the benefits of Tyvek over felt paper are questionable. It is much lighter and easier to install, but the durability may be worse. Unfortunately I ran out of Tyvek with one more wrap to go and had to buy a new roll anyway. So much for saving money. It feels strange to have my house branded with a company's name. It looks like a DuPont Company Christmas present. This is the first mass produced material I have used so far (and possibly the only). It will be nice to cover this miracle of science with some good old clapboard siding.
After the Tyvek, I moved onto windows and doors. I built one window frame months ago which set the size of my steel casement windows. It took a morning with coffee and some graph paper to work out all of the nitty gritty details of the steel casements so that I could move onto the other windows. The small window on the North side of the house will have two swinging casements while the bigger window on the East side will have four of the same casements. Once I had all of this figured out I built the second frame. It was really enjoyable to be sitting at my bench chiseling mortices on another rainy day. It seems I do most of my work on rainy days- or maybe it just rains a lot in New England. 

I primed the sills and frames all the way around to hinder rot, then installed them for good, shimming the frames to within a sixteenth inch of square across the diagonals. The big salvaged window is also installed permanently so that the casements all swing freely without binding. Hopefully this doesn't change when I move the house. One last thing I did was to trim down a salvaged door frame from the Firehouse and install it. The difference between 100 year old wood and modern wood is incredible. This door frame is so perfectly straight, the grain is tight and it still weighs more than a modern production frame, even after over 100 years of service. Measuring in at 6'2" by 28", this will be a very small front door.

Next, I need to finish painting a couple of bundles of siding, install the exterior trim and hang the siding!


Thursday, September 2, 2010

A hand hewn beam

At least I stopped at hand hewing the timbers for my house. If I had tried to do that, this project would never be finished. This post is not directly related my little house, but it is a technique that could have been used to prepare my timbers in a more traditional way, so I  am going to write about it anyway.

Last week I took out a wall in our house to open up some space and allow more light to pass through. The wall was load bearing and I still wanted to create some separation between the rooms, so my housemates and I decided to replace it with two posts supporting a narrow countertop. We found a suitable Black Locust tree on the property, felled, debarked and cut two posts from the trunk. One would remain in the round, and has a natural crotch in it that mimics a brace. The second one I hewed into a 7"x7" beam to replace one that was original to the house.

Black Locust is a tree that is native to Southeastern US, but was brought to New England for its strong, fast growing, rot resistant wood. Like many other non-native plants, it has become invasive in its new territory, so I had no problem harvesting one from our property.

This was my first time hewing a beam, and I definitely learned a few things from it. I used a traditional method and tools for the job. The beam was laid out from the ends, then the ends were connected with a chalk line. With the layout finished, each face was notched with an axe down to the layout lines, turned ninety degrees, the waste chopped away with a broad faced hewing hatchet and then smoothed out with an adze. It sounds simple enough, yet it took three to four hours of back breaking work per side to make the beam. I also should have heeded the advice of a friend to hew the log while it was fresh. I never thought a month's time drying would make much of a difference, but I was wrong. With an axe sharpened to the point where it would cut hairs, a swing with all of my might would rarely drive the head more than 1/2" into the tree!

Something else I might have experienced was Black Locust poisoning. I was going thorough a lot of water durring this process and with woodchips flying all over a twenty foot radius, it was not uncommon to spit some out after taking a gulp of water. What I didn't know was that the young shoots, seeds and inner bark of Black Locust are highly toxic to most animals. It seems that I might have picked up a mild case of posining by drinking my locust-chip tea. For two days I suffered though a slight fever with a dizzy, achy head, achy muscles and complete lack of energy. It could have just been some bug going around, but I think that I'll put a cap on my water bottle next time anyway!

All in all, it was a really cool project but I'm happy that I bought the beams for my house precut.

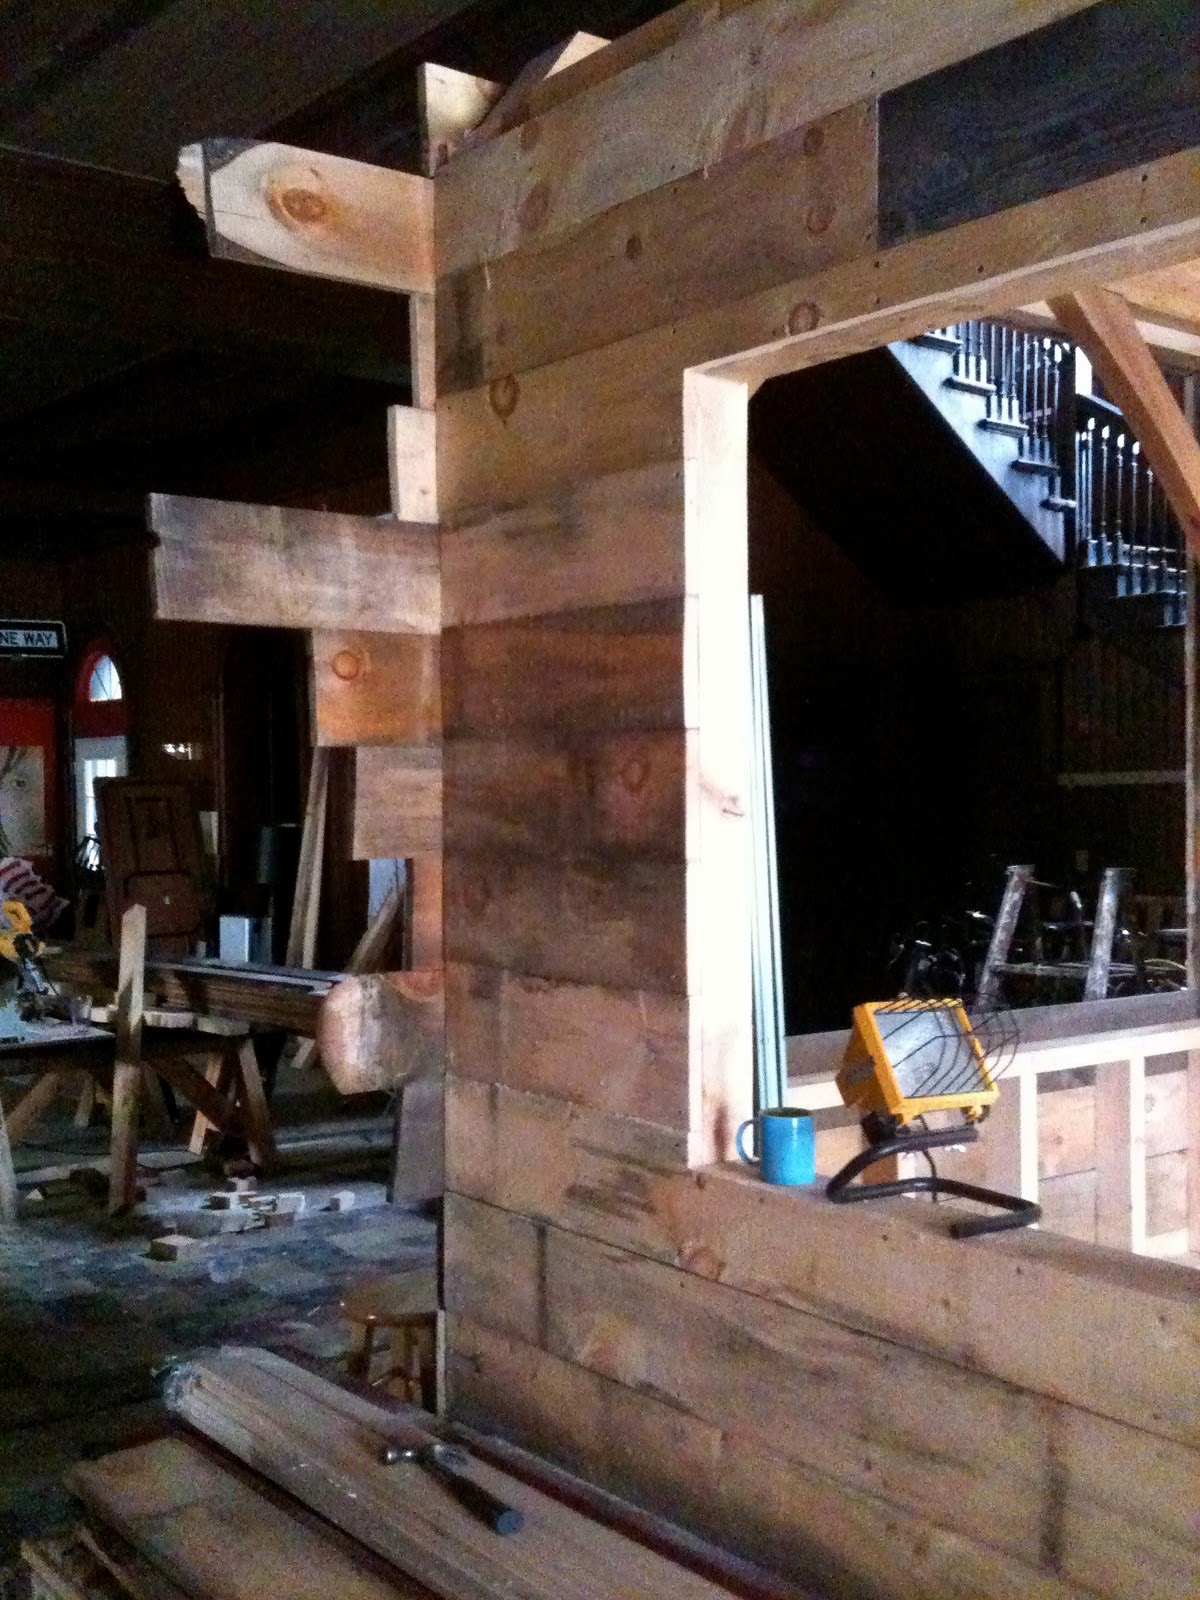
I have finished priming most of my siding, so the next step is to put up some 1" by pine sheathing and install the siding!