Friday, September 30, 2011

Kitchen thoughts


Here is the most recent plan for my kitchen. I know it seems a bit pre-mature to be thinking about the kitchen when I don't have windows, a stove and insulation but I love cooking. Sometimes it is easier to think about doing things than to actually do them anyway. Somewhere there is a healthy balance between doing and thinking.
Earlier this summer  found a propane range and oven on craigslist. It is a very basic 24" model but it seems to be about the right balance of size and functionality. Originally I wanted the stove to be on the north wall where the sink is shown in the model, but this seemed to be a bit to big for that spot. The width is fine but it is just too deep. Having the stove on the north wall seemed to create a good flow between the prep space, sink and the table/countertop that separates the kitchen from the living space. The stove in the current location will work but I hate to break up that one long counter space. If I find a slightly smaller stove I will revert back to that plan, but for now I am going to stick to the current model, unless anyone has a better idea?

Cleaning

This week I did not have time to get any actual work done on my house, but I did do a thorough cleaning. All of the construction (and lack of any sort of roof for a few days) has left a lot of dust in the house. I sweep regularly but it is hard to keep clean since I live in the woods and there are many crevices to collect dust in the unfinished walls. The other problem that has been bothering me is mold. It has been so wet this summer that everything grows mold. A pair of my boots even turned green and fuzzy! I don't think that I have seen more than two days where the relative humidity has been below 95% in the past three months. Seriously. Anyway, It feels really good to get everything clean again. I had to run an extension cord down here so that I could use a hepa vacuum for the mold. I will definitely have to use some bleach on some spots. Maybe Fall will bring dry weather?

Thursday, September 15, 2011

Roof installation, Days 2, 3 and 4


On Sunday I woke up early with a mission. First to Home Depot, the only hardware store open on a sunday morning. Armed with rope, shackles and other bits of hardware I headed to the checkout line. While in line, there was an announcement over the intercom requesting a moment of remembrance for the victims of 9/11 followed by an incredibly awkward moment of silence. Many people seemed to be unsure of what to do. The clerks, will all of their supervision and conditioning to pump people through nervously looked around trying to decide if they were actually supposed to stop ringing up customers. The moment of silence lasted almost a full minute, just long enough for the person in front of me to finish his very detailed conversation with the checkout lady about his pussing poison ivy rash and how to cure it with gasoline. It was a very bizarre experience.


Next I was off to a house I have been working on all summer (an incredible place with a whole story of its own) to pick up my block and tackle and some words of encouragement from Dermot, the owner of the house. My next stop was the shop to quickly weld up a steel bipod for the crane that I had devised the night before. My plan was to mount this structure to the ridge beam on the opposite side of the roof from where the first panel would go. The cradle in the top of this support would hold a two-by-four about eighteen inches above the peak of the roof. The other end of the two-by-four would be lagged to the plate at the foot of the rafters. With this in place, I could hook the block and tackle to the top of the crane and haul the panel up the roof using a ladder as a ramp.


Pat showed up by noon and with the help of a few guys at the shop we stacked the panels on the truck in the order and orientation they would be installed on the roof. I did not want to have to be maneuvering these things around too much on the muddy ground the house is sitting on. We drove down to the house and spent several hours finishing what I didn't get to on Saturday and setting up the crane.


It must have been about five o'clock by the time we were finally ready to hoist the first panel. I scrounged up as many people as i could convince to help us out and we lifted the fist panel into position.


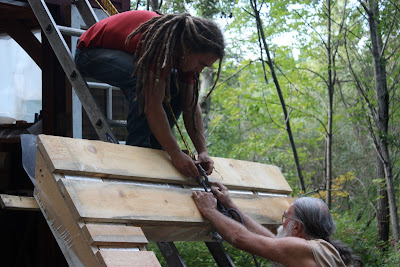
I have a fuzzy memory of lots of activity, and then all of the sudden the first panel was screwed into place!


The second panel went up without a hitch also. At this point we were all exhausted and running out of light. Perfect time for a celebratory dinner at my favorite Vietnamese restaurant, Da Lat, with Lauren and Pat.


On Monday after work I came back for a second round. Jack and I put up the two panels on the north side in under two hours!


Last night after work I scrambled to roll out tar paper and seal up the house once again for another advancing storm. Lauren stayed over with me for the first night under the new roof. We fell asleep to the  the nearly full moon traversing the sky directly across the skylight and then were woken up around three in the morning to an unbelievable lightning show and storm! I am so happy to have a more permanent roof over my head!

The next step is to finish making the plans for the copper roof, and hopefully install it before winter! But for now, I am left with a big mess to clean up and a truck stuck deep in the mud.

Roof installation, Day 1


To explain the first day, I need to take a step back many months to the day that I towed the house down into the woods. There was a snow storm predicted that night so I did all I could with the help of a couple of friends to throw the rafters into place and roll a tarp out over it. It was getting dark and there was no time to fit the rafters or batten the tarp properly. We finished it by the light of headlamps, but it was not pretty. That snowstorm was the first of what seemed like a continuous fall of snow that winter. I never got a chance to fixing the tarp properly, but it somehow held tight as roofs all over New England were collapsing from the snow load.


Jumping back to the end of August, I found myself back up on that roof on a rainy Saturday, a day before hurricane Irene was expected to make landfall. It seemed strange to be spending so much time redoing the tarp only a week before the actual roof would be ready to install, but I did not want the predicted ten inches of rain soaking through my floor. Thankfully it did hold through the hurricane and two weeks later I was up there again ripping it off for good.


Saturday was devoted to finishing all of the details that I forgot or procrastinated on. I started be removing the rafters, purlins and ridge beams one by one to fix up the tight joinery. I did not cut the rafters at the same time as the rest of the frame, so things tended to dry and move differently. It didn't take much to make everything match up though- just a thin shaving with the chisel here and there. Next time I am giving myself a little bit of wiggle room. Instead of making my mortices and tenons exactly two inches wide, the tenon will be a hare smaller and the mortice slightly bigger.


Another small detail I forgot when I was cutting the timbers was to chamfer the to edges of the ridge beam and outside plates to match the roofline. This would have been simple while the timbers were still on the bunks, but was it was a bit tricky making a beveled plunge cut while balancing 12 feet up in the air on a four inch wide beam.


Originally I wanted a skylight on both sides of the roof over the loft but decided to limit it to just the south side to make everything a little simpler. At some point while laying in the loft I changed my mind again. This has not been a simple project, why start now? I want two skylights. To accommodate another window I needed to slide the purlin on the north side down by about a foot. I had already mistakenly cut a pocket in this location on one rafter so it was a simple matter of chopping one to match on the other rafter. It was not a long list, but it definitely kept me occupied for a full day and for part of Sunday. Pleasant work though.

Saturday night I slept on the loft under the stars, twisting my mind around the task of lifting four 150-pound plus panels sixteen feet into the air. As my thoughts darted from overhanging tree branches to medieval gantries and physics lectures, an idea started to formulate. Now I had a plan and help scheduled for noon the next day. Time for some sleep.

Tuesday, September 13, 2011

A real roof!

Well I have run out of energy tonight trying to catch the blog up on the progress of the past three months, but check back soon so see how several good friends and I made this happen!

Ready to go!

The final step on the panels was to paint them. I wanted to paint the pine before the panels were installed because it is so much easier to just roll the paint on while they are laying on the shop floor than it would be to try to paint them on the ceiling, around the beams while trying not to spill or spatter paint all over the house. I wanted to paint my ceiling rather than oil or stain it. Most people cringe when I tell them I want to paint the wood, but there is so much wood in this house that it becomes too much at a certain point. Pine is not known for having particularly pretty grain anyway. I do love the effect of painted boards against wooden beams though. You can still tell it is wood by the uneven gaps between the boards and the texture from the occasional knot that shows through the paint. The white surface makes the beams really stand out and accentuates the grain on them. A semi-gloss white surface should help brighten and expand the small interior of the house as well.


After setting the nail heads and filling the holes I rolled the primer on. Steve at Economy paints helped me out with the selection of the right materials. I wanted to go with an oil paint because I think it looks better and is more durable. I still feel like latex paints don't look as permanent. Apparently oil paints are becoming less common now (I know, that makes me sound much older than I actually am). However Steve informed me that they did have one paint that would work for what I wanted, but it was an industrial coating. I liked the sound of that. Industrial = durable, right? I think he enjoyed seeing me perk up at his suggestion. Now he was excited about the project and made me promise to return with photos of the finished house.

The primer went on beautifully and the next day I rolled on the first top coat. I went home excited that with one more quick coat of paint, this chapter of the project would be finished. When I came back the next night after work, I was horrified to see that the paint had never leveled out and still showed all of the texture from the roller. I looked the the surface of a refrigerator! There was no way I was going to put another coat of paint over that. I left disheartened, not meeting my goal of finishing the panels before I left for a long weekend. I called Steve back for advice, and he agrees with me that i should sand the surface a bit, thin the paint and roll it on with a quarter inch nap roller. He assured me that would solve my problems. While at the hardware store picking up some supplies, I decided to get a second opinion from their paint department. When I told the guy my plan, he frowned at me and shouted, "You cant do that! It will take you forever! Not worth it". Oh well. He has no idea. He even seemed reluctant to help me to the sandpaper isle, as if to save me from all of that unnecessary labor.

With supplies in hand, I went back to the shop and spent about three hours sanding the stippling off of the panels. Not bad at all for the amount of time I will be spending staring at that ceiling. With the help of Corwin, who I share the shop with, we thinned the paint, rolled it on and by his suggestion lightly followed the roller with a brush to align all of the marks. It came out beautifully. I can still see a bit of the stippling from the fist coat here and there, but overall it looks incredible. Every step of this process has been a lesson.

Panelling


It took me a few evenings to install the shiplap pine boards that will be the show face on the inside of my house. Before the pine I stapled a 6-mil polyethylene vapor barrier over the framing. Installing the paneling was another simple process of cutting boards to length and nailing them down like the skip-sheathing. I used a little copper shim to keep a slight gap between the boards as I nailed them down. It is important to leave some room for the boards to expand and contract with the changing seasons to avoid buckling. I hope I left enough space. It has been incredibly humid so hopefully the boards are as wide as they will get. A long pipe clamp helped persuade crooked boards into place or square up crooked panels.


One thing that I learned is that one should always paint both sides of a board at the same time to avoid movement. I back primed all of the boards weeks ago but left the front bare until they were installed on the panels. It is not a big deal, but some of the boards cupped because moisture could permeate the surface unevenly. Once again I lucked out with waste. I ordered 20% more lumber than I should have needed to allow for bad boards and cutoffs. Somehow, I had almost no waste. The cuts for the full length boards left a piece slightly longer than the space on the edge of the window RO. I barely had a scrap longer than two inches by the time I was finished. Now I have a bunch of extra paneling to use elsewhere.

Packed with foam.


Over several nights I worked on insulating the roof. First I nailed the sheathing to what will be the top side of the panel. I am using rough cut 1"x8" pine. The boards are spaced about an inch apart. This is called skip-sheathing and is a traditional underlayment for a copper roof.


The next step in the roof panel process was filling them with the insulation. It was a fairly straight forward process of cutting the foam to width and forcing it in between the studs. If there were any gaps I filled them with expanding spray foam.


The only hitch that I ran into was that some of the foam was actually up to a quarter inch thicker than the studs. I was worried that the shiplap panelling would not be tight to the studs. To remedy this I simply tacked some old plaster lath onto the edge of the studs to thicken them.

Found insulation

I finally made a decision on my insulation. A big batch of four-inch thick Polyisocyanurate showed up on craigslist for a price I couldn't refuse. I sacrificed a bit of my desire to have more natural materials in my house for a product with an incredible R value, light weight, ease and stability. Polyiso insulation is a rigid foam board with an R-value of about 9 per inch, making my roof R-36. It is easy to use since the sheets can be cut to fit the stud pockets with just about anything with a slightly cerated edge. It will not settle over time which is important for my roof since it will be moved around from time to time and it will add some rigidity to the panel. Best of all, I only paid $12 per 4'x8' sheet. I am happy with my decision, even if I will never be able to pronounce the chemical name of the stuff.

Ants vs. chain saw

After a tired day at work I knew what had to be done. Running on pure adrenalin, I came home, gassed up the chainsaw and weedwacker and went at them- The trees that is. Several hours later, covered in tree parts and ferns I had a little front yard! I had successfully won the first battle with the advancing forrest.


Ants, along with fungus, mold and rot love moist wood. My problem was caused by two things. My house is situated in a damp area to start with. To make matters worse, Norway Maple saplings and ferns had sprung up all over, under and around my house. The ants could easily invade the house from any angle they wished. Once inside, they found a great place under the mattress where two plywood sheets were overlapping each other. If the problem had gone any longer I am sure they would have made a nest in there. After a good cleaning and airing out, the ants seem to have understood my wishes. I still can usually find one or two in the house at any given time, but they seem to be just checking out the craftsmanship. Only room for one carpenter in here!